This post is only necessary if you want to test the work of App Inventor directly on your phone. Otherwise skip this post. This means that if you want to test your work in Emulator, then there is no need to set up your phone.
After completing this post, you will be able to use your Android phone with App Inventor and it will show the output of the app in each of your steps. First of all, connect the phone to the computer with the USB cable of your phone. You will then need to install your driver software (if not done and not included with the App Inventor Installer package).
Whatever model you use, you must have an SD card in your set.
Now follow your own steps to make sure your phone is ready to be connected to the app inventor:
1. Press the Home button to go to your phone's home screen.
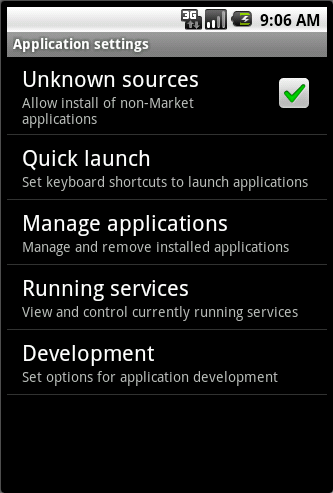
2. Click on 'Menu' then 'Setting' and finally 'Application'.
3. If there is anything called Unknown sources then see if it is checked.
4. Now go to 'Development'.
5. See if USB Debugging and Stay Awake are checked.
If these are correct then your phone is now working.
Unlock if your phone is clicked. Your phone will show 2 notifications on your phone as soon as it is connected to PC via USB cable-
* USB Connected means your phone is connected to your computer.
* USB Debugging Connected means App Inventor can control your phone from your computer.
Note:
1. If your phone is Nexus One or Nexus S then you will see this notification Turn on USB Storage. You will not click on this button. And if you do, you turn it off Turn USB storage again.
2. If your phone is a Droid X, follow the steps below:
1. Open the notification panel at the top of the phone screen.
2. Click on USB Connected.
3. Click on Charge Only.
Our next step will be to start using App Inventor and create the first app.
So far today. All will be well. And yes, I didn't talk much today. If anyone has trouble understanding, please let me know.


Post a Comment